
The end of 2024 has been reached. Tools like SEGW are classified under STOP🚩 on many tech radars. Perfect time for a new blog post, where we explore how to implement a custom etag for the CREATE_DEEP_ENTITY method in SAP Gateway (SEGW), isn’t it? Let’s get started!🚀
The Problem
When developing complex SAPUI5 freestyle apps i like to use CREATE_DEEP_ENTITY for creating and updating the data in the backend. If we create a data record there is no problem, but as soon as we update a data record via CREATE_DEEP_ENTITY we want to check that we are working with the latest version of the entity. To check if there is a more recent version available we normally use the etag mechanism provided by SAP. However, since the method CREATE_DEEP_ENTITY is intended for creation, SAP has not implemented any etag logic for this. Therefore, we need to implement a custom solution to handle etags for this method.
Solution
To get the whole thing working we have to make adjustements in SAP Gateway Service Builder (SEGW) and in the Frontend.
Annotate a property as an etag – SAP Gateway Service Builder (SEGW)
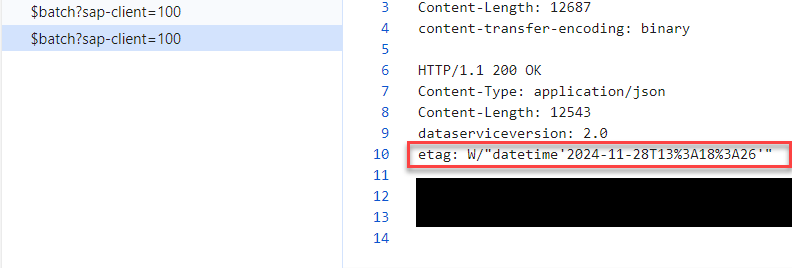
To be clear, we still use the standard functionality to receive etags when executing get requests. For that annotate the corresponding property of your entity type as etag. If you are not sure how to do it check out the point “How to annotate a property as an etag?” in the scn blog post by Andre Fischer – How to handle etags in sap gateway using code based implementation.
Requirements met? Let’s check by executing a get request and verifying that the etag is present in the response.

Adding the etag as a custom header in the create request – Frontend
To implement a custom etag for the CREATE_DEEP_ENTITY method, we have to first add a custom header to our create request that contains the etag value from the get request.
Here is a code snippet of how you can do it, written in TypeScript. The method _save wraps the create method of the ODataModel into a promise that we call via the method save.
The method save contains some methods that are not documented here.
_generateDeepEntity– in this method you create your json you gonna send to the backend. Obviously, make sure to have a nested json otherwiseCREATE_DEEP_ENTITYwill not be triggered.💡this.getProperty("/data/__metadata").etagcontains the etag of the get request. If you did the get request not manually rather by just binding the view or whatever you can request the etag via the methodgetETagof theODataModel.
    private _save(deepEntity: DeepEntityType, eTag: string): Promise<ExpandedEntityType> {
        return new Promise((resolve, reject) => {
            const path = "/EntitySet";

            const parameters = {
                headers: { //CREATE_DEEP_ENTITY doesn't support eTag by default
                    "custometag": eTag
                },
                success: resolve,
                error: reject
            }

            this.serviceModel.create(path, deepEntity, parameters);
        })
    }
    public async save(forceUpdate = false): Promise<void> {
        this.setProperty("/busy", true);
        const deepEntity = this._generateDeepEntity(),
            eTag = forceUpdate ? "*" : this.getProperty("/data/__metadata").etag;

        try {
            await this.serviceModel.metadataLoaded();
            let writeResponse = await this._save(deepEntity, eTag);
            this.setProperty("/data", writeResponse);
            return this.getProperty("/data");
        } catch (error) {
            throw error;
        } finally {
            this.setProperty("/busy", false);
        }

    }
Implement custom etag check – Backend
The frontend now sends the custom etag header along with the create request.
In this step, we will implement the logic to check the custom etag sent by the frontend against the current state of the entity in the backend.
In the method CREATE_DEEP_ENTITY we can read out the custom etag from the request headers via the following code:
*--- read out custom etag
    TRY.
        lo_facade ?= /iwbep/if_mgw_conv_srv_runtime~get_dp_facade( ).
        lt_request_headers = lo_facade->get_request_header( ).
      CATCH /iwbep/cx_mgw_tech_exception.
    ENDTRY.
    lv_etag = VALUE #( lt_request_headers[ name = 'custometag' ]-value OPTIONAL ).
Next we need to compare the custom etag with the corresponding property that acts as the etag. In our case it is the last_changed_at timestamp.
Here is a code snippet of how you can do it:
- Check if the etag is provided or it contains the force update via ‘*’
- if the etag is provided convert the edm_datetime back to an abap timestamp via
edm_datetime_etag_to_tstmp - if the etag doesn’t match the current last_changed_at timestamp we throw the precondition failed error (412)
  class-methods CHECK_CUSTOM_ETAG
    importing
      !IV_LAST_CHANGED_AT type TIMESTAMP
      !IV_LAST_CHANGED_BY type UNAME
      !IV_ETAG type STRING
    raising
      /IWBEP/CX_MGW_BUSI_EXCEPTION .
  METHOD check_custom_etag.
    DATA: lv_date    TYPE d,
          lv_time    TYPE t,
          ls_message TYPE scx_t100key.

    "if eTag is empty no check is needed, same if the update is forced via '*'
    CHECK iv_etag IS NOT INITIAL AND iv_etag NE '*'.

    DATA(lv_etag_timestamp) = edm_datetime_etag_to_tstmp( iv_etag = iv_etag ).

*--- throw error with status code 412 if eTag not equals last changed information
    IF lv_etag_timestamp NE iv_last_changed_at.
      CONVERT TIME STAMP iv_last_changed_at TIME ZONE sy-zonlo INTO DATE lv_date TIME lv_time.

      "Last modified on & at & by &.
      ls_message-msgid = 'ZXX_XXX'.
      ls_message-msgno = 'XXX'.
      ls_message-attr1 = |{ lv_date DATE = ENVIRONMENT }|.
      ls_message-attr2 = |{ lv_time TIME = ENVIRONMENT }|.
      ls_message-attr3 = iv_last_changed_by.

      RAISE EXCEPTION TYPE /iwbep/cx_mgw_busi_exception
        EXPORTING
          http_status_code = /iwbep/cx_mgw_busi_exception=>gcs_http_status_codes-precondition_failed
          textid           = ls_message.
    ENDIF.


  ENDMETHOD.
Implement reload/overwrite logic – Frontend
We are almost there. If the CREATE_DEEP_ENTITY fails due to a precondition error, we need to prompt the user for action. For that we will display a MessageBox using sap.m.MessageBox that informs the user of the precondition error. The MessageBox will have two buttons: one for reloading the data from the server and another for overwriting the existing record. Based on the user’s selection, we will either fetch the latest data from the server or proceed with the forced CREATE_DEEP_ENTITY.
    public onSave(): void {
        const oi18n = this.getResourceBundle();

        this.save().then((data) => {
            //TODO: data saved successfully do lifecycle things
        }).catch((error) => {
            switch (error.statusCode) {
                case "412": //eTag
                    MessageBox.confirm(<string>oi18n.getText("newerVersionAvailable", [this.getErrorMessageByError(error)]), {
                        actions: [<string>oi18n.getText("overwrite"), <string>oi18n.getText("reload")],
                        onClose: ((action: string) => {
                            if (action === <string>oi18n.getText("overwrite")) {
                                this.save(true).then((data) => {
                                   //TODO: data saved successfully do lifecycle things
                                }).catch((error) => {
                                    //TODO: show errors via message popover
                                })
                            } else if (action === <string>oi18n.getText("reload")) {
                                //TODO: read newest version from backend
                            }
                        })
                    })
                    break;
                default:
                //TODO: show errors via message popover
            }
        });

    }
//i18n keys
//newerVersionAvailable=A newer version is available. You have two options:\n\n 📌You can load the newer version and discard your changes.\n 📌You can ignore the newer version and overwrite the record.\n\n
//overwrite=Overwrite
//reload=Reload
    /**
     * @description Retrieves the error message from the error object
     */
    public getErrorMessageByError(error: any): string {
        let errorMessage = "";
        try {
            const response = JSON.parse(error.responseText);
            errorMessage = response.error.message.value;
        } finally {
            return errorMessage;
        }
    }
For another code example see the scn blog post of maxrupp: Optimistic locking: ETag in SAPUI5.