
It was very difficult for me to define a title for this blog post. What is this post about? Over time i have created several Data Form Dialogs in SAPUI5. By Data Form Dialog i mean a dialog for creating data entrys. For example, you have a table with addresses for a business partner. To create a new address, the user enters a dialog – a Data Form Dialog.
What do you need for such a Data Form Dialog? Actually, almost always the same:
- Validation of the fields when entering and saving
- Resetting of the fields etc. when closing the dialog
Of course, sometimes you also need additional functions such as an address check when saving, which checks whether the address entered is valid at all. But the basic structure of such a Data Form Dialog is always the same.
This blog post is about a best practice approach how to implement such a Data Form Dialog quickly and easily. Let’s get started with the creation of the dialog fragment!
💾 I published a sample application on GitHub. The application uses the “RMTSAMPLEFLIGHT” OData service. Deploy the application to your system or run the application in your IDE and adjust the
neo-app.jsonaccordingly to see a working example. https://github.com/BloggingWithJan/Data-Form-Dialog-UI5
Dialog fragment
First we need a dialog with a sap.ui.layout.form.SimpleForm or a sap.ui.layout.form.Form. In the corresponding aggregation we can define the different input fields and their labels. In order to be able to display validation messages to the user, it is important that the input controls have the following properties:
valueState(required)valueStateText(recommended)
Controls that meet the requirements:
⚠️ If a control does not have the property
valueStateTextit is quite difficult to show the user in an dialog why thevalueStateis set to, for example,sap.ui.core.ValueState.Error. Controls that lack thevalueStateTextproperty should therefore only be used if they are self-explanatory, e.g.sap.m.CheckBox
To create validation rules we use the sap.ui.model.types like:
<core:FragmentDefinition xmlns="sap.m" xmlns:core="sap.ui.core" xmlns:f="sap.ui.layout.form" xmlns:l="sap.ui.layout">
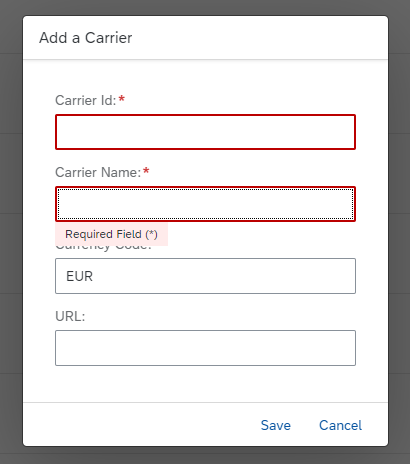
<Dialog class="sapUiContentPadding" stretch="{device>/system/phone}" title="Add a Carrier">
<content>
<f:SimpleForm editable="true" layout="ResponsiveGridLayout" labelSpanXL="12" labelSpanL="12" labelSpanM="12" labelSpanS="12"
adjustLabelSpan="false" emptySpanXL="0" emptySpanL="0" emptySpanM="0" emptySpanS="0" singleContainerFullSize="false">
<f:content>
<Label required="true" text="Carrier Id"/>
<Input value="{ path: 'carrid', type: 'sap.ui.model.type.String', constraints: { minLength: 2 } }" valueStateText="Required Field (*)"
maxLength="3"/>
<Label required="true" text="Carrier Name"/>
<Input value="{ path: 'CARRNAME', type: 'sap.ui.model.type.String', constraints: { minLength: 1 }}" valueStateText="Required Field (*)"/>
<Label required="true" text="Currency Code"/>
<Input value="{ path: 'CURRCODE', type: 'sap.ui.model.type.String', constraints: { minLength: 1 }}" valueStateText="Required Field (*)"/>
<Label required="false" text="URL"/>
<Input value="{ path: 'URL', type: 'sap.ui.model.type.String', constraints: { maxLength: 255 } }"/>
</f:content>
</f:SimpleForm>
</content>
<buttons>
<Button text="Save" press=".save"/>
<Button text="Cancel" press=".cancel"/>
</buttons>
</Dialog>
</core:FragmentDefinition>
ui5-validator
To validate our ui5 dialog when pressing the save button we use the ui5-validator from the sap experience magician Qualiture. For more information see: Generic UI5 form validator
Import the Validator source code into your application. In the example, the validator source code is stored in the /control folder. In order to be able to use the validator at any time, we initialise it in the onInit method:
	onInit: function () {
			this.oValidator = new Validator();
		},
open dialog function
Next, we create a function to create and open the dialog. To get the data entered in the dialog directly into a model, we create a draft (_createDraft) which we bind to the dialog.
		addNewCarrier: function () {
			var oView = this.getView();
			// create popover
			if (!this._oNewCarrierDialog) {
				this._oNewCarrierDialog = Fragment.load({
					id: oView.getId(),
					name: "sample.HowToSimpleFormDialog.view.fragments.NewCarrier",
					controller: this
				}).then(function (oDialog) {
					oView.addDependent(oDialog);
					return oDialog;
				}.bind(this));
			}

			this._oNewCarrierDialog.then(function (oDialog) {
				oDialog.bindElement(this._createDraft());
				oDialog.open();
			}.bind(this));

		}
There are several ways to create a new data entry. In my opinion, the best way is always to work with the available standard methods of the ODataModel, for example createEntry. The method creates a new object record based on the metadata of the entity type. A context object is returned which can be used to bind against the newly created object. It is also possible to specify many parameters, such as predefined properties or an batchGroupId. With a batchGroupId we can define a request group. All requests that belong to this group are combined into a single batch request when submitting changes. And in our case the most important: Requests that do not have the batchGroupId are not included. Which brings us to the next point – Saving the data.
⚠️The property
batchGroupIdis deprecated. Use the propertygroupIdinstead.
		_createDraft: function () {
			var oServiceModel = this.getView().getModel();
			var oContext = oServiceModel.createEntry("CarrierCollection", {
				batchGroupId: this._createBatchGroupId("CarrierCreation"),
				properties: {
					carrid: "",
					CARRNAME: "",
					CURRCODE: "EUR",
					URL: ""
				}
			});

			return oContext.getPath();
		}
		_createBatchGroupId: function (sBatchGroupId) {
			var oServiceModel = this.getView().getModel(),
				aDeferredGroup = oServiceModel.getDeferredGroups();

			//Add a new GroupId
			if (!aDeferredGroup.includes(sBatchGroupId)) {
				aDeferredGroup.push(sBatchGroupId);
				oServiceModel.setDeferredGroups(aDeferredGroup);
			}
		}
save function
When the user wants to save the entered data, we first validate it using the ui5-validator. If the validator detects errors, the save process is aborted and the errors are display to the user, using the valueState and valueStateText propertys of the input controls.

However, if no errors are found during validation, we save the data using the submitChanges method of the ODataModel. The groupId parameter ensures that only the changes assigned to the groupId are submitted. If, for example, existing entries can also be changed in the application, these changes are ignored.
		save: function () {
			var oServiceModel = this.getView().getModel();
			this._oNewCarrierDialog.then(function (oDialog) {
				if (this.oValidator.validate(oDialog)) {
					oServiceModel.submitChanges({
						groupId: "CarrierCreation",
						success: function (data) {
							debugger;
							oDialog.close();
						},
						error: function (err) {
							debugger;
							oDialog.close();
						}
					});
				}
			}.bind(this));
		}
cancel function
When the user cancels the creation process, we discard the created draft using the method resetChanges of the ODataModel. Furthermore, we clear the valuestate of the input controls so that the next time the dialog is opened, no input controls have an old valuestate.
	cancel: function () {
			var oServiceModel = this.getView().getModel();
			this._oNewCarrierDialog.then(function (oDialog) {
				oServiceModel.resetChanges([oDialog.getBindingContext().getPath()], undefined, true); //"delete" the created entry
				this.oValidator.clearValueState(oDialog); //clear valuestates
				oDialog.close();
			}.bind(this));
		}