
This blog post shows how to implement the SmartVariantManagement for an sap.m.Table. The coding presented here can also be applied to other controls such as sap.ui.table.Table.
⚠️ SmartVariantManagement doesn’t work for standalone apps. This blog post is only relevant for applications running in the Fiori Launchpad (SAP Fiori Launchpad Component).
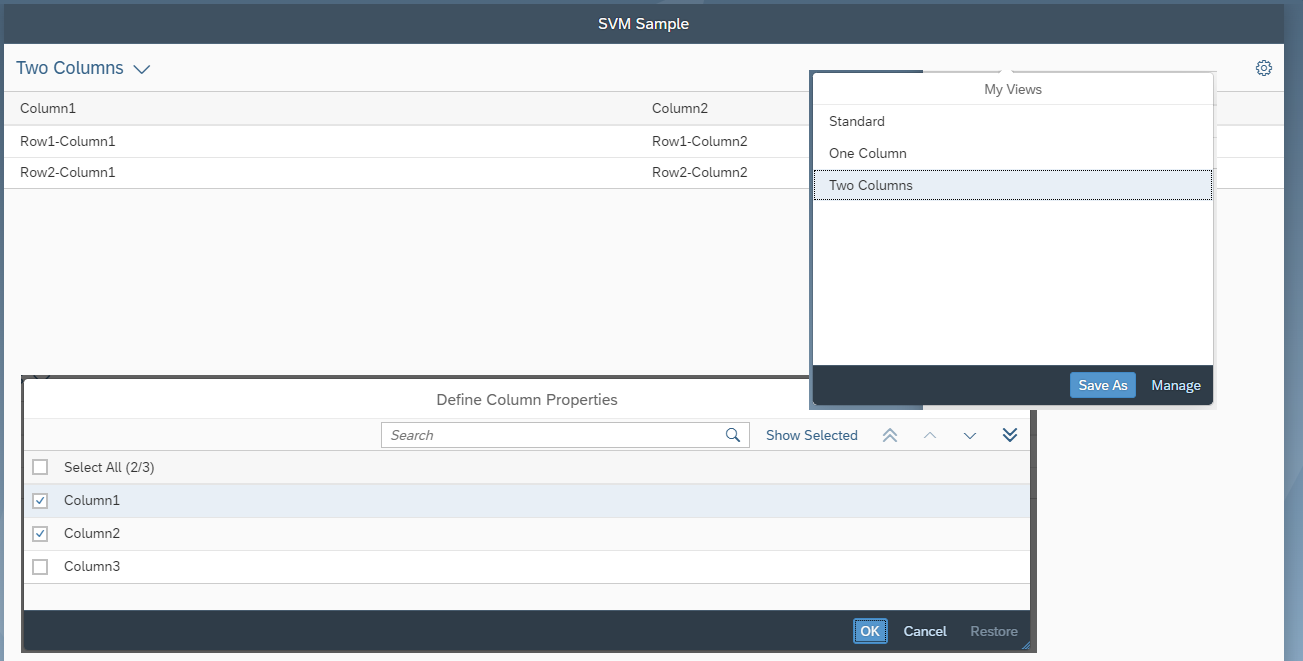
A complete example implementation is available at the following GIT repo: https://github.com/BloggingWithJan/SVMTable
In the following we will go through the different steps to get the SmartVariantManagement functionality running.
Import the SVMTable Custom Control
First of all create a folder named SVMTable in your application where you store the custom control. Import the SVMTable.js and PersonalizationDialog.fragment.xml from the GIT repo in your folder. The SVMTable.js custom control extends an sap.m.Table. Additionally it uses the PersonalizationDialog.fragment.xml to show the sap.m.P13nDialog where the user can personalize the table.
💡 It is best to move the control to a library right from the start. Then it can be reused in any other application.
⚠️ After the files are imported into your application or an library make sure to adjust the namespace in the
Table.extendargument aswell as the namespace in the_onPersonalizationmethod where the fragment get’s loaded.
Include the SVMTable in the view
To include the control into the view you need to define the path.
<mvc:View ...  xmlns:svmTable="sample.SVM.control.SVMTable">
</mvc:View>"
Next the SVMTable can be integrated in the view.
<svmTable:SVMTable id="svmTable" persistencyKey="sample.SVM.View1.Table">
</svmTable:SVMTable>
⚠️ It is important to define a unique persistency key. I recommended to use the namespace of the SAPUI5 application plus the view name and the defined id.
It is also essential that each column in the aggregation columns has a unique id. This is the only way the personalization can work.
<svmTable:columns>
	<Column id="column1">
		<Text text="{i18n>column1}"/>
	</Column>
	<Column id="column2">
		<Text text="{i18n>column2}"/>
	</Column>
	<Column id="column3">
		<Text text="{i18n>column3}"/>
	</Column>
</svmTable:columns>
At last a sap.ui.comp.smartvariants.SmartVariantManagement and a sap.m.Button have to be added to the headerToolbar. If necessary, the path for the sap.ui.comp.smartvariants.SmartVariantManagement must be defined.
<mvc:View ...  xmlns:smartv="sap.ui.comp.smartvariants">
</mvc:View>"
<svmTable:SVMTable id="svmTable" persistencyKey="sample.SVM.View1.Table">
	<svmTable:headerToolbar>
		<OverflowToolbar>
			<smartv:SmartVariantManagement id="smartVariantManagement"/>
			<ToolbarSpacer/>
			<Button icon="sap-icon://action-settings" id="p13nTableSettings"/>
		</OverflowToolbar>
	</svmTable:headerToolbar>
</svmTable:SVMTable>
💡 It is possible to automatically create the headerToolbar including its controls in the
SVMTablecustom control. In order to ensure the flexibility of the design of the headerToolbar i decided against it.
Connect everything in the controller
Finally the sap.ui.comp.smartvariants.SmartVariantManagement and the sap.m.Button must be connected to the SVMTable in the onInit method of the corresponding controller. In addition the i18n resourcebundle must be given to the SVMTable so that the table columns are displayed correctly in the personalization dialog.
//initialize SVM for SVMTable
this.oTable = this.getView().byId("svmTable");

this._oTableSmartVariantManagement = this.getView().byId("smartVariantManagement");

this._oP13nButton = this.getView().byId("p13nTableSettings");

this.oi18nResourceBundle = this.getOwnerComponent().getModel("i18n").getResourceBundle();

this.oTable.initializeSVM(this._oTableSmartVariantManagement, this._oP13nButton, this.oi18nResourceBundle, this.getView());
That’s it. The sap.m.Table now has a SmartVariantManagement functionality. To activate the SmartVariantManagement functionality also for the sap.ui.comp.filterbar.FilterBar check out this blog post: sap.ui.comp.filterbar.FilterBar with SmartVariantManagement functionality